[TOC]

类-对象-练习题

1、以下类定义中哪些是类属性,哪些是实例属性?

类属性和实例属性区别

  • 类属性:类外面,可以通过实例对象.类属性类名.类属性进行调用。类里面,通过self.类属性类名.类属性进行调用。
  • 实例属性 :类外面,可以通过实例对象.实例属性调用。类里面,通过self.实例属性调用。
  • 实例属性就相当于局部变量。出了这个类或者这个类的实例对象,就没有作用了。
  • 类属性就相当于类里面的全局变量,可以和这个类的所有实例对象共享。

2、怎么定义私有⽅法?

在 Python 中定义私有变量只需要在变量名或函数名前加上“__”两个下划线,那么这个函数或变量就会为私有的了

3、尝试执行以下代码,并解释错误原因:

1
2
3
4
5
class C:
def myFun():
print('Hello!')
c = C()
c.myFun()

4、按照以下要求定义一个游乐园门票的类,并尝试计算2个成人+1个小孩平日票价。

要求:

  • 平日票价100元
  • 周末票价为平日的120%
  • 儿童票半价
1
2
3
class Ticket():
# your code here

class C:
def myFun():
print(‘Hello!’)
c = C()
c.myFun()

# C() 不是 class C:
1
2
3
4
5
6
7
8
9
10
11
12
13
14
15
16
17
18
19
20
import datetime

class Ticket():

def __init__(self,adult_num,child_num):
self.adult_num = adult_num
self.child_num = child_num
__Ticket_price = 100
now_day = (datetime.datetime.utcnow() + datetime.timedelta(hours=8))
@property
def _ticket_price_onweekend(self):
return self.__Ticket_price*1.2
def ticket_price(self):
if self.now_day == 5 or self.now_day == 6:
return self.__Ticket_price*1.2*(self.adult_num+ 0.5*self.child_num)
return self.__Ticket_price*(self.adult_num+ 0.5*self.child_num)

ticket = Ticket(1,4)
print(ticket.ticket_price())
print(ticket._ticket_price_onweekend)
300.0
120.0

魔法属性-练习题

1、上面提到了许多魔法方法,如__new__,__init__, __str__,__rstr__,__getitem__,__setitem__等等,请总结它们各自的使用方法。

__init__(self[, ...])

  • 构造器,当一个实例被创建的时候调用的初始化方法

__new__(cls[, ...])

  • __new__是在一个对象实例化的时候所调用的第一个方法,在调用__init__初始化前,先调用__new__
  • __new__至少要有一个参数cls,代表要实例化的类,此参数在实例化时由 Python 解释器自动提供,后面的参数直接传递给__init__
  • __new__对当前类进行了实例化,并将实例返回,传给__init__self。但是,执行了__new__,并不一定会进入__init__,只有__new__返回了,当前类cls的实例,当前类的__init__才会进入。
  • __new__没有正确返回当前类cls的实例,那__init__是不会被调用的,即使是父类的实例也不行,将没有__init__被调用。
  • 可利用__new__实现单例模式。

  • __new__方法主要是当你继承一些不可变的 class 时(比如int, str, tuple), 提供给你一个自定义这些类的实例化过程的途径。

__str__(self):

  • 当你打印一个对象的时候,触发__str__
  • 当你使用%s格式化的时候,触发__str__
  • str强转数据类型的时候,触发__str__

__repr__(self):

  • reprstr的备胎
  • __str__的时候执行__str__,没有实现__str__的时候,执行__repr__
  • repr(obj)内置函数对应的结果是__repr__的返回值
  • 当你使用%r格式化的时候 触发__repr__

  • __getitem__(self, key)定义获取容器中元素的行为,相当于self[key]

  • __setitem__(self, key, value)定义设置容器中指定元素的行为,相当于self[key] = value

2、利用python做一个简单的定时器类

要求:

  • 定制一个计时器的类。
  • startstop方法代表启动计时和停止计时。
  • 假设计时器对象t1print(t1)和直接调用t1均显示结果。
  • 当计时器未启动或已经停止计时时,调用stop方法会给予温馨的提示。
  • 两个计时器对象可以进行相加:t1+t2
  • 只能使用提供的有限资源完成。
1
2
3
4
5
6
7
8
9
10
11
12
13
14
15
16
17
18
19
20
21
22
23
24
25
26
27
28
29
30
31
32
33
34
35
36
37
38
39
40
41
42
43
44
45
46
47
48
49
50
51
52
53
54
55
56
57
58
import time


class Mytime(object):
def __init__(self):
self.__info = '未开始计时!'
self.__begin = None
self.__end = None
self.__jg = 0

def __str__(self):
return self.__info

def __repr__(self):
return self.__info

def start(self):
print('计时开始...')
self.__begin = time.localtime()

def stop(self):
if not self.__begin:
print('提示:请先调用start()开始计时!')
return
self.__end = time.localtime()
self.__jg = time.mktime(self.__end) - time.mktime(self.__begin)
self.__info = '共运行了%d秒' % self.__jg
print('计时结束!')
return self.__jg

def __add__(self, other):
return '共运行了%d秒' % (other.__jg + self.__jg)


t1 = Mytime()
print(t1)
# 未开始计时!
t1.stop()
# 提示:请先调用start()开始计时!
t1.start()
# 计时开始...
time.sleep(5)
t1.stop()
# 计时结束!
print(t1)
# 共运行了5秒
t2 = Mytime()
t2.start()
# 计时开始...
time.sleep(7)
t2.stop()
# 计时结束!
print(t2)
# 共运行了7秒
print(t1 + t2)
# 共运行了12秒


未开始计时!
提示:请先调用start()开始计时!
计时开始...
计时结束!
共运行了5秒
计时开始...
计时结束!
共运行了7秒
共运行了12秒
1

类与对象

1. 对象 = 属性 + 方法

对象是类的实例。换句话说,类主要定义对象的结构,然后我们以类为模板创建对象。类不但包含方法定义,而且还包含所有实例共享的数据。

  • 封装:信息隐蔽技术

我们可以使用关键字 class 定义 Python 类,关键字后面紧跟类的名称、分号和类的实现。

【例子】

1
2
3
4
5
6
7
8
9
10
11
12
13
14
15
16
17
18
19
20
21
22
23
24
25
26
27
28
29
30
31
32
33
34
35
36
37
38
39
40
41
42
43
44
45
46
47
48
49
50
51
class Turtle:  # Python中的类名约定以大写字母开头
"""关于类的一个简单例子"""
# 属性
color = 'green'
weight = 10
legs = 4
shell = True
mouth = '大嘴'

# 方法
def climb(self):
print('我正在很努力的向前爬...')

def run(self):
print('我正在飞快的向前跑...')

def bite(self):
print('咬死你咬死你!!')

def eat(self):
print('有得吃,真满足...')

def sleep(self):
print('困了,睡了,晚安,zzz')


tt = Turtle()
print(tt)
# <__main__.Turtle object at 0x0000007C32D67F98>

print(type(tt))
# <class '__main__.Turtle'>

print(tt.__class__)
# <class '__main__.Turtle'>

print(tt.__class__.__name__)
# Turtle

tt.climb()
# 我正在很努力的向前爬...

tt.run()
# 我正在飞快的向前跑...

tt.bite()
# 咬死你咬死你!!

# Python类也是对象。它们是type的实例
print(type(Turtle))
# <class 'type'>
<__main__.Turtle object at 0x0000023D59FEEB48>
<class '__main__.Turtle'>
Turtle
我正在很努力的向前爬...
我正在飞快的向前跑...
咬死你咬死你!!
<class 'type'>
  • 继承:子类自动共享父类之间数据和方法的机制

【例子】

1
2
3
4
5
6
7
8
9
10
class MyList(list):
pass


lst = MyList([1, 5, 2, 7, 8])
lst.append(9)
lst.sort()
print(lst)

# [1, 2, 5, 7, 8, 9]
[1, 2, 5, 7, 8, 9]
  • 多态:不同对象对同一方法响应不同的行动

【例子】

1
2
3
4
5
6
7
8
9
10
11
12
13
14
15
16
17
18
19
20
21
22
23
24
25
26
class Animal:
def run(self):
raise AttributeError('子类必须实现这个方法')


class People(Animal):
def run(self):
print('人正在走')


class Pig(Animal):
def run(self):
print('pig is walking')


class Dog(Animal):
def run(self):
print('dog is running')


def func(animal):
animal.run()


func(Pig())
# pig is walking
pig is walking

2. self 是什么?

Python 的 self 相当于 C++ 的 this 指针。

【例子】

1
2
3
4
5
6
7
8
9
10
class Test:
def prt(self):
print(self)
print(self.__class__)


t = Test()
t.prt()
# <__main__.Test object at 0x000000BC5A351208>
# <class '__main__.Test'>
<__main__.Test object at 0x0000023D59FE1F48>
<class '__main__.Test'>

类的方法与普通的函数只有一个特别的区别 —— 它们必须有一个额外的第一个参数名称(对应于该实例,即该对象本身),按照惯例它的名称是 self。在调用方法时,我们无需明确提供与参数 self 相对应的参数。

【例子】

1
2
3
4
5
6
7
8
9
10
11
12
13
14
15
16
17
18
class Ball:
def setName(self, name):
self.name = name

def kick(self):
print("我叫%s,该死的,谁踢我..." % self.name)


a = Ball()
a.setName("球A")
b = Ball()
b.setName("球B")
c = Ball()
c.setName("球C")
a.kick()
# 我叫球A,该死的,谁踢我...
b.kick()
# 我叫球B,该死的,谁踢我...
我叫球A,该死的,谁踢我...
我叫球B,该死的,谁踢我...

3. Python 的魔法方法

据说,Python 的对象天生拥有一些神奇的方法,它们是面向对象的 Python 的一切…

它们是可以给你的类增加魔力的特殊方法…

如果你的对象实现了这些方法中的某一个,那么这个方法就会在特殊的情况下被 Python 所调用,而这一切都是自动发生的…

类有一个名为__init__(self[, param1, param2...])的魔法方法,该方法在类实例化时会自动调用。

【例子】

1
2
3
4
5
6
7
8
9
10
11
12
13
14
15
16

class Ball:
def __init__(self, name):
self.name = name

def kick(self):
print("我叫%s,该死的,谁踢我..." % self.name)


a = Ball("球A")
b = Ball("球B")
c = Ball("球C")
a.kick()
# 我叫球A,该死的,谁踢我...
b.kick()
# 我叫球B,该死的,谁踢我...
我叫球A,该死的,谁踢我...
我叫球B,该死的,谁踢我...

4. 公有和私有

在 Python 中定义私有变量只需要在变量名或函数名前加上“__”两个下划线,那么这个函数或变量就会为私有的了。

【例子】类的私有属性实例

1
2
3
4
5
6
7
8
9
10
11
12
13
14
15
16
17
18
class JustCounter:
__secretCount = 0 # 私有变量
publicCount = 0 # 公开变量

def count(self):
self.__secretCount += 1
self.publicCount += 1
print(self.__secretCount)


counter = JustCounter()
counter.count() # 1
counter.count() # 2
print(counter.publicCount) # 2

print(counter._JustCounter__secretCount) # 2 Python的私有为伪私有
print(counter.__secretCount)
# AttributeError: 'JustCounter' object has no attribute '__secretCount'
1
2
2
2


---------------------------------------------------------------------------

AttributeError                            Traceback (most recent call last)

<ipython-input-8-01ed63e738f6> in <module>
     15 
     16 print(counter._JustCounter__secretCount)  # 2 Python的私有为伪私有
---> 17 print(counter.__secretCount)
     18 # AttributeError: 'JustCounter' object has no attribute '__secretCount'


AttributeError: 'JustCounter' object has no attribute '__secretCount'

【例子】类的私有方法实例

1
2
3
4
5
6
7
8
9
10
11
12
13
14
15
16
17
18
19
20
21
22
23
24
25
26
27
28
class Site:
def __init__(self, name, url):
self.name = name # public
self.__url = url # private

def who(self):
print('name : ', self.name)
print('url : ', self.__url)

def __foo(self): # 私有方法
print('这是私有方法')

def foo(self): # 公共方法
print('这是公共方法')
self.__foo()


x = Site('老马的程序人生', 'https://blog.csdn.net/LSGO_MYP')
x.who()
# name : 老马的程序人生
# url : https://blog.csdn.net/LSGO_MYP

x.foo()
# 这是公共方法
# 这是私有方法

x.__foo()
# AttributeError: 'Site' object has no attribute '__foo'
name  :  老马的程序人生
url :  https://blog.csdn.net/LSGO_MYP
这是公共方法
这是私有方法


---------------------------------------------------------------------------

AttributeError                            Traceback (most recent call last)

<ipython-input-9-555cf676b575> in <module>
     25 # 这是私有方法
     26 
---> 27 x.__foo()
     28 # AttributeError: 'Site' object has no attribute '__foo'


AttributeError: 'Site' object has no attribute '__foo'

5. 继承

Python 同样支持类的继承,派生类的定义如下所示:

1
2
3
4
5
6
class DerivedClassName(BaseClassName):
<statement-1>
.
.
.
<statement-N>

BaseClassName(示例中的基类名)必须与派生类定义在一个作用域内。除了类,还可以用表达式,基类定义在另一个模块中时这一点非常有用:

1
2
3
4
5
6
class DerivedClassName(modname.BaseClassName):
<statement-1>
.
.
.
<statement-N>

【例子】如果子类中定义与父类同名的方法或属性,则会自动覆盖父类对应的方法或属性。

1
2
3
4
5
6
7
8
9
10
11
12
13
14
15
16
17
18
19
20
21
22
23
24
25
26
27
28
29
30
31
32
33
34
35
# 类定义
class people:
# 定义基本属性
name = ''
age = 0
# 定义私有属性,私有属性在类外部无法直接进行访问
__weight = 0

# 定义构造方法
def __init__(self, n, a, w):
self.name = n
self.age = a
self.__weight = w

def speak(self):
print("%s 说: 我 %d 岁。" % (self.name, self.age))


# 单继承示例
class student(people):
grade = ''

def __init__(self, n, a, w, g):
# 调用父类的构函
people.__init__(self, n, a, w)
self.grade = g

# 覆写父类的方法
def speak(self):
print("%s 说: 我 %d 岁了,我在读 %d 年级" % (self.name, self.age, self.grade))


s = student('小马的程序人生', 10, 60, 3)
s.speak()
# 小马的程序人生 说: 我 10 岁了,我在读 3 年级
小马的程序人生 说: 我 10 岁了,我在读 3 年级

注意:如果上面的程序去掉:people.__init__(self, n, a, w),则输出:说: 我 0 岁了,我在读 3 年级,因为子类的构造方法把父类的构造方法覆盖了。

【例子】

1
2
3
4
5
6
7
8
9
10
11
12
13
14
15
16
17
18
19
20
21
22
23
24
25
26
27
28
29
30
31
32
33
34
35
36
37
38
39
40
41
42
43
import random as r
class Fish:
def __init__(self):
self.x = r.randint(0, 10)
self.y = r.randint(0, 10)

def move(self):
self.x -= 1
print("我的位置", self.x, self.y)


class GoldFish(Fish): # 金鱼
pass


class Carp(Fish): # 鲤鱼
pass


class Salmon(Fish): # 三文鱼
pass


class Shark(Fish): # 鲨鱼
def __init__(self):
# Fish.__init__(self)
self.hungry = True

def eat(self):
if self.hungry:
print("吃货的梦想就是天天有得吃!")
self.hungry = False
else:
print("太撑了,吃不下了!")
self.hungry = True


g = GoldFish()
g.move() # 我的位置 9 4
s = Shark()
s.eat() # 吃货的梦想就是天天有得吃!
s.move()
# AttributeError: 'Shark' object has no attribute 'x'
我的位置 5 5
吃货的梦想就是天天有得吃!
我的位置 6 7

解决该问题可用以下两种方式:

  • 调用未绑定的父类方法Fish.__init__(self)

  • 使用super函数super().__init__()

1
2
3
4
5
6
7
8
9
10
11
12
class Shark(Fish):  # 鲨鱼
def __init__(self):
super().__init__()
self.hungry = True

def eat(self):
if self.hungry:
print("吃货的梦想就是天天有得吃!")
self.hungry = False
else:
print("太撑了,吃不下了!")
self.hungry = True

Python 虽然支持多继承的形式,但我们一般不使用多继承,因为容易引起混乱。

1
2
3
4
5
6
class DerivedClassName(Base1, Base2, Base3):
<statement-1>
.
.
.
<statement-N>

需要注意圆括号中父类的顺序,若是父类中有相同的方法名,而在子类使用时未指定,Python 从左至右搜索,即方法在子类中未找到时,从左到右查找父类中是否包含方法。

1
2
3
4
5
6
7
8
9
10
11
12
13
14
15
16
17
18
19
20
21
22
23
24
25
26
27
28
29
30
31
32
33
34
35
36
37
38
39
40
41
42
43
44
45
46
47
48
49
50
51
52
53
54
55
56
57
58
59
60
61
62
63
64
65
66
67
68
69
70
71
72
# 类定义
class People:
# 定义基本属性
name = ''
age = 0
# 定义私有属性,私有属性在类外部无法直接进行访问
__weight = 0

# 定义构造方法
def __init__(self, n, a, w):
self.name = n
self.age = a
self.__weight = w

def speak(self):
print("%s 说: 我 %d 岁。" % (self.name, self.age))


# 单继承示例
class Student(People):
grade = ''

def __init__(self, n, a, w, g):
# 调用父类的构函
People.__init__(self, n, a, w)
self.grade = g

# 覆写父类的方法
def speak(self):
print("%s 说: 我 %d 岁了,我在读 %d 年级" % (self.name, self.age, self.grade))


# 另一个类,多重继承之前的准备
class Speaker:
topic = ''
name = ''

def __init__(self, n, t):
self.name = n
self.topic = t

def speak(self):
print("我叫 %s,我是一个演说家,我演讲的主题是 %s" % (self.name, self.topic))


# 多重继承
class Sample01(Speaker, Student):
a = ''

def __init__(self, n, a, w, g, t):
Student.__init__(self, n, a, w, g)
Speaker.__init__(self, n, t)


test = Sample01("Tim", 25, 80, 4, "Python")
test.speak() # 方法名同,默认调用的是在括号中排前地父类的方法


# 我叫 Tim,我是一个演说家,我演讲的主题是 Python

class Sample02(Student, Speaker):
a = ''

def __init__(self, n, a, w, g, t):
Student.__init__(self, n, a, w, g)
Speaker.__init__(self, n, t)


test = Sample02("Tim", 25, 80, 4, "Python")
test.speak() # 方法名同,默认调用的是在括号中排前地父类的方法

# Tim 说: 我 25 岁了,我在读 4 年级
我叫 Tim,我是一个演说家,我演讲的主题是 Python
Tim 说: 我 25 岁了,我在读 4 年级

6. 组合

【例子】

1
2
3
4
5
6
7
8
9
10
11
12
13
14
15
16
17
18
19
20
21
22
class Turtle:
def __init__(self, x):
self.num = x


class Fish:
def __init__(self, x):
self.num = x


class Pool:
def __init__(self, x, y):
self.turtle = Turtle(x)
self.fish = Fish(y)

def print_num(self):
print("水池里面有乌龟%s只,小鱼%s条" % (self.turtle.num, self.fish.num))


p = Pool(2, 3)
p.print_num()
# 水池里面有乌龟2只,小鱼3条
水池里面有乌龟2只,小鱼3条

7. 类、类对象和实例对象

类对象和实例对象

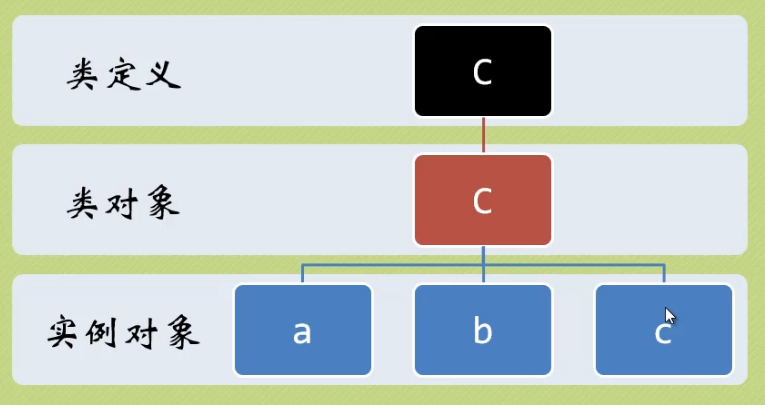
类对象:创建一个类,其实也是一个对象也在内存开辟了一块空间,称为类对象,类对象只有一个。

1
2
3
# 类对象
class A(object):
pass

实例对象:就是通过实例化类创建的对象,称为实例对象,实例对象可以有多个。

【例子】

1
2
3
4
# 实例化对象 a、b、c都属于实例对象。
a = A()
b = A()
c = A()

类属性:类里面方法外面定义的变量称为类属性。类属性所属于类对象并且多个实例对象之间共享同一个类属性,说白了就是类属性所有的通过该类实例化的对象都能共享。

【例子】

1
2
3
4
class A():
a = xx #类属性
def __init__(self):
A.a = xx #使用类属性可以通过 (类名.类属性)调用。

实例属性:实例属性和具体的某个实例对象有关系,并且一个实例对象和另外一个实例对象是不共享属性的,说白了实例属性只能在自己的对象里面使用,其他的对象不能直接使用,因为self是谁调用,它的值就属于该对象。

【例子】

1
2
3
class 类名():
__init__(self):
self.name = xx #实例属性

类属性和实例属性区别

  • 类属性:类外面,可以通过实例对象.类属性类名.类属性进行调用。类里面,通过self.类属性类名.类属性进行调用。
  • 实例属性 :类外面,可以通过实例对象.实例属性调用。类里面,通过self.实例属性调用。
  • 实例属性就相当于局部变量。出了这个类或者这个类的实例对象,就没有作用了。
  • 类属性就相当于类里面的全局变量,可以和这个类的所有实例对象共享。

【例子】

1
2
3
4
5
6
7
8
9
10
11
12
13
14
15
16
17
18
19
20
21
22
23
24
25
26
27
28
29
30
31
32
33
34
35
36
37
38
39
40
41
42
43
44
45
46
47
48
49
50
51
52
# 创建类对象
class Test(object):
class_attr = 100 # 类属性

def __init__(self):
self.sl_attr = 100 # 实例属性

def func(self):
print('类对象.类属性的值:', Test.class_attr) # 调用类属性
print('self.类属性的值', self.class_attr) # 相当于把类属性 变成实例属性
print('self.实例属性的值', self.sl_attr) # 调用实例属性


a = Test()
a.func()

# 类对象.类属性的值: 100
# self.类属性的值 100
# self.实例属性的值 100

b = Test()
b.func()

# 类对象.类属性的值: 100
# self.类属性的值 100
# self.实例属性的值 100

a.class_attr = 200
a.sl_attr = 200
a.func()

# 类对象.类属性的值: 100
# self.类属性的值 200
# self.实例属性的值 200

b.func()

# 类对象.类属性的值: 100
# self.类属性的值 100
# self.实例属性的值 100

Test.class_attr = 300
a.func()

# 类对象.类属性的值: 300
# self.类属性的值 200
# self.实例属性的值 200

b.func()
# 类对象.类属性的值: 300
# self.类属性的值 300
# self.实例属性的值 100
类对象.类属性的值: 100
self.类属性的值 100
self.实例属性的值 100
类对象.类属性的值: 100
self.类属性的值 100
self.实例属性的值 100
类对象.类属性的值: 100
self.类属性的值 200
self.实例属性的值 200
类对象.类属性的值: 100
self.类属性的值 100
self.实例属性的值 100
类对象.类属性的值: 300
self.类属性的值 200
self.实例属性的值 200
类对象.类属性的值: 300
self.类属性的值 300
self.实例属性的值 100

注意:属性与方法名相同,属性会覆盖方法。

【例子】

1
2
3
4
5
6
7
8
9
10
11
class A:
def x(self):
print('x_man')


aa = A()
aa.x() # x_man
aa.x = 1
print(aa.x) # 1
aa.x()
# TypeError: 'int' object is not callable
x_man
1


---------------------------------------------------------------------------

TypeError                                 Traceback (most recent call last)

<ipython-input-19-6db89adc213b> in <module>
      8 aa.x = 1
      9 print(aa.x)  # 1
---> 10 aa.x()
     11 # TypeError: 'int' object is not callable


TypeError: 'int' object is not callable

8. 什么是绑定?

Python 严格要求方法需要有实例才能被调用,这种限制其实就是 Python 所谓的绑定概念。

Python 对象的数据属性通常存储在名为.__ dict__的字典中,我们可以直接访问__dict__,或利用 Python 的内置函数vars()获取.__ dict__

【例子】

1
2
3
4
5
6
7
8
9
10
11
12
13
14
15
16
17
18
19
20
21
22
23
24
25
26
27
28
29
30
31
32
33
34
35
36
37
class CC:
def setXY(self, x, y):
self.x = x
self.y = y

def printXY(self):
print(self.x, self.y)


dd = CC()
print(dd.__dict__)
# {}

print(vars(dd))
# {}

print(CC.__dict__)
# {'__module__': '__main__', 'setXY': <function CC.setXY at 0x000000C3473DA048>,
#'printXY': <function CC.printXY at 0x000000C3473C4F28>, '__dict__': <attribute
#'__dict__' of 'CC' objects>, '__weakref__': <attribute '__weakref__' of 'CC' objects>,
#'__doc__': None}

dd.setXY(4, 5)
print(dd.__dict__)
# {'x': 4, 'y': 5}

print(vars(CC))
# {'__module__': '__main__', 'setXY': <function CC.setXY at 0x000000632CA9B048>,
#'printXY': <function CC.printXY at 0x000000632CA83048>, '__dict__':
#<attribute '__dict__' of 'CC' objects>, '__weakref__': <attribute '__weakref__'
#of 'CC' objects>, '__doc__': None}

print(CC.__dict__)
# {'__module__': '__main__', 'setXY': <function CC.setXY at 0x000000632CA9B048>,
#'printXY': <function CC.printXY at 0x000000632CA83048>, '__dict__':
#<attribute '__dict__' of 'CC' objects>, '__weakref__': <attribute '__weakref__'
#of 'CC' objects>, '__doc__': None}
{}
{}
{'__module__': '__main__', 'setXY': <function CC.setXY at 0x0000023D5A0A25E8>, 'printXY': <function CC.printXY at 0x0000023D5A0A2DC8>, '__dict__': <attribute '__dict__' of 'CC' objects>, '__weakref__': <attribute '__weakref__' of 'CC' objects>, '__doc__': None}
{'x': 4, 'y': 5}
{'__module__': '__main__', 'setXY': <function CC.setXY at 0x0000023D5A0A25E8>, 'printXY': <function CC.printXY at 0x0000023D5A0A2DC8>, '__dict__': <attribute '__dict__' of 'CC' objects>, '__weakref__': <attribute '__weakref__' of 'CC' objects>, '__doc__': None}

9. 一些相关的内置函数(BIF)

  • issubclass(class, classinfo) 方法用于判断参数 class 是否是类型参数 classinfo 的子类。
  • 一个类被认为是其自身的子类。
  • classinfo可以是类对象的元组,只要class是其中任何一个候选类的子类,则返回True

【例子】

1
2
3
4
5
6
7
8
9
10
11
12
class A:
pass


class B(A):
pass


print(issubclass(B, A)) # True
print(issubclass(B, B)) # True
print(issubclass(A, B)) # False
print(issubclass(B, object)) # True
True
True
False
True
  • isinstance(object, classinfo) 方法用于判断一个对象是否是一个已知的类型,类似type()
  • type()不会认为子类是一种父类类型,不考虑继承关系。
  • isinstance()会认为子类是一种父类类型,考虑继承关系。
  • 如果第一个参数不是对象,则永远返回False
  • 如果第二个参数不是类或者由类对象组成的元组,会抛出一个TypeError异常。

【例子】

1
2
3
4
5
6
7
8
9
10
11
12
13
14
15
16
17
18
a = 2
print(isinstance(a, int)) # True
print(isinstance(a, str)) # False
print(isinstance(a, (str, int, list))) # True


class A:
pass


class B(A):
pass


print(isinstance(A(), A)) # True
print(type(A()) == A) # True
print(isinstance(B(), A)) # True
print(type(B()) == A) # False
True
False
True
True
True
True
False
  • hasattr(object, name)用于判断对象是否包含对应的属性。

【例子】

1
2
3
4
5
6
7
8
9
10
11
class Coordinate:
x = 10
y = -5
z = 0


point1 = Coordinate()
print(hasattr(point1, 'x')) # True
print(hasattr(point1, 'y')) # True
print(hasattr(point1, 'z')) # True
print(hasattr(point1, 'no')) # False
True
True
True
False
  • getattr(object, name[, default])用于返回一个对象属性值。

【例子】

1
2
3
4
5
6
7
8
9
class A(object):
bar = 1


a = A()
print(getattr(a, 'bar')) # 1
print(getattr(a, 'bar2', 3)) # 3
print(getattr(a, 'bar2'))
# AttributeError: 'A' object has no attribute 'bar2'
1
3


---------------------------------------------------------------------------

AttributeError                            Traceback (most recent call last)

<ipython-input-25-a381bb20461b> in <module>
      6 print(getattr(a, 'bar'))  # 1
      7 print(getattr(a, 'bar2', 3))  # 3
----> 8 print(getattr(a, 'bar2'))
      9 # AttributeError: 'A' object has no attribute 'bar2'


AttributeError: 'A' object has no attribute 'bar2'

【例子】这个例子很酷!

1
2
3
4
5
6
7
8
9
10
11
class A(object):
def set(self, a, b):
x = a
a = b
b = x
print(a, b)


a = A()
c = getattr(a, 'set')
c(a='1', b='2') # 2 1
2 1
  • setattr(object, name, value)对应函数 getattr(),用于设置属性值,该属性不一定是存在的。

【例子】

1
2
3
4
5
6
7
8
9
10
class A(object):
bar = 1


a = A()
print(getattr(a, 'bar')) # 1
setattr(a, 'bar', 5)
print(a.bar) # 5
setattr(a, "age", 28)
print(a.age) # 28
1
5
28
  • delattr(object, name)用于删除属性。

【例子】

1
2
3
4
5
6
7
8
9
10
11
12
13
14
15
16
17
18
19
20
21
class Coordinate:
x = 10
y = -5
z = 0


point1 = Coordinate()

print('x = ', point1.x) # x = 10
print('y = ', point1.y) # y = -5
print('z = ', point1.z) # z = 0

delattr(Coordinate, 'z')

print('--删除 z 属性后--') # --删除 z 属性后--
print('x = ', point1.x) # x = 10
print('y = ', point1.y) # y = -5

# 触发错误
print('z = ', point1.z)
# AttributeError: 'Coordinate' object has no attribute 'z'
x =  10
y =  -5
z =  0
--删除 z 属性后--
x =  10
y =  -5


---------------------------------------------------------------------------

AttributeError                            Traceback (most recent call last)

<ipython-input-28-e10298e6b2b2> in <module>
     18 
     19 # 触发错误
---> 20 print('z = ', point1.z)
     21 # AttributeError: 'Coordinate' object has no attribute 'z'


AttributeError: 'Coordinate' object has no attribute 'z'
  • class property([fget[, fset[, fdel[, doc]]]])用于在新式类中返回属性值。
    • fget — 获取属性值的函数
    • fset — 设置属性值的函数
    • fdel — 删除属性值函数
    • doc — 属性描述信息

【例子】

1
2
3
4
5
6
7
8
9
10
11
12
13
14
15
16
17
18
19
class C(object):
def __init__(self):
self.__x = None

def getx(self):
return self.__x

def setx(self, value):
self.__x = value

def delx(self):
del self.__x

x = property(getx, setx, delx, "I'm the 'x' property.")


cc = C()
cc.x = 2
print(cc.x) # 2
None

魔法方法

魔法方法总是被双下划线包围,例如__init__

魔法方法是面向对象的 Python 的一切,如果你不知道魔法方法,说明你还没能意识到面向对象的 Python 的强大。

魔法方法的“魔力”体现在它们总能够在适当的时候被自动调用。

魔法方法的第一个参数应为cls(类方法) 或者self(实例方法)。

  • cls:代表一个类的名称
  • self:代表一个实例对象的名称

1. 基本的魔法方法

__init__(self[, ...])

  • 构造器,当一个实例被创建的时候调用的初始化方法

【例子】

1
2
3
4
5
6
7
8
9
10
11
12
13
14
15
class Rectangle:
def __init__(self, x, y):
self.x = x
self.y = y

def getPeri(self):
return (self.x + self.y) * 2

def getArea(self):
return self.x * self.y


rect = Rectangle(4, 5)
print(rect.getPeri()) # 18
print(rect.getArea()) # 20
18
20

__new__(cls[, ...])

  • __new__是在一个对象实例化的时候所调用的第一个方法,在调用__init__初始化前,先调用__new__
  • __new__至少要有一个参数cls,代表要实例化的类,此参数在实例化时由 Python 解释器自动提供,后面的参数直接传递给__init__
  • __new__对当前类进行了实例化,并将实例返回,传给__init__self。但是,执行了__new__,并不一定会进入__init__,只有__new__返回了,当前类cls的实例,当前类的__init__才会进入。

【例子】

1
2
3
4
5
6
7
8
9
10
11
12
13
14
15
16
17
18
19
20
21
22
23
24
25
26
27
28
29
30
31
32
33
34
35
36
37
38
39
40
41
42
43
44
45
46
47
48
49
50
51
52
53
54
55
56
57
58
59
60
class A(object):
def __init__(self, value):
print("into A __init__")
self.value = value

def __new__(cls, *args, **kwargs):
print("into A __new__")
print(cls)
return object.__new__(cls)


class B(A):
def __init__(self, value):
print("into B __init__")
self.value = value

def __new__(cls, *args, **kwargs):
print("into B __new__")
print(cls)
return super().__new__(cls, *args, **kwargs)


b = B(10)

# 结果:
# into B __new__
# <class '__main__.B'>
# into A __new__
# <class '__main__.B'>
# into B __init__

class A(object):
def __init__(self, value):
print("into A __init__")
self.value = value

def __new__(cls, *args, **kwargs):
print("into A __new__")
print(cls)
return object.__new__(cls)


class B(A):
def __init__(self, value):
print("into B __init__")
self.value = value

def __new__(cls, *args, **kwargs):
print("into B __new__")
print(cls)
return super().__new__(A, *args, **kwargs) # 改动了cls变为A


b = B(10)

# 结果:
# into B __new__
# <class '__main__.B'>
# into A __new__
# <class '__main__.A'>
into B __new__
<class '__main__.B'>
into A __new__
<class '__main__.B'>
into B __init__
into B __new__
<class '__main__.B'>
into A __new__
<class '__main__.A'>
  • __new__没有正确返回当前类cls的实例,那__init__是不会被调用的,即使是父类的实例也不行,将没有__init__被调用。
  • 可利用__new__实现单例模式。

【例子】

1
2
3
4
5
6
7
8
9
10
11
12
13
14
15
16
17
18
19
20
21
22
23
24
class Earth:
pass


a = Earth()
print(id(a)) # 260728291456
b = Earth()
print(id(b)) # 260728291624

class Earth:
__instance = None # 定义一个类属性做判断

def __new__(cls):
if cls.__instance is None:
cls.__instance = object.__new__(cls)
return cls.__instance
else:
return cls.__instance


a = Earth()
print(id(a)) # 512320401648
b = Earth()
print(id(b)) # 512320401648
2462526686472
2462526878088
2462526688392
2462526688392
  • __new__方法主要是当你继承一些不可变的 class 时(比如int, str, tuple), 提供给你一个自定义这些类的实例化过程的途径。

【例子】

1
2
3
4
5
6
7
8
class CapStr(str):
def __new__(cls, string):
string = string.upper()
return str.__new__(cls, string)


a = CapStr("i love lsgogroup")
print(a) # I LOVE LSGOGROUP
I LOVE LSGOGROUP

__del__(self)

析构器,当一个对象将要被系统回收之时调用的方法。

Python 采用自动引用计数(ARC)方式来回收对象所占用的空间,当程序中有一个变量引用该 Python 对象时,Python 会自动保证该对象引用计数为 1;当程序中有两个变量引用该 Python 对象时,Python 会自动保证该对象引用计数为 2,依此类推,如果一个对象的引用计数变成了 0,则说明程序中不再有变量引用该对象,表明程序不再需要该对象,因此 Python 就会回收该对象。

大部分时候,Python 的 ARC 都能准确、高效地回收系统中的每个对象。但如果系统中出现循环引用的情况,比如对象 a 持有一个实例变量引用对象 b,而对象 b 又持有一个实例变量引用对象 a,此时两个对象的引用计数都是 1,而实际上程序已经不再有变量引用它们,系统应该回收它们,此时 Python 的垃圾回收器就可能没那么快,要等专门的循环垃圾回收器(Cyclic Garbage Collector)来检测并回收这种引用循环。

【例子】

1
2
3
4
5
6
7
8
9
10
11
12
13
14
15
16
17
class C(object):
def __init__(self):
print('into C __init__')

def __del__(self):
print('into C __del__')


c1 = C()
# into C __init__
c2 = c1
c3 = c2
del c3
del c2
del c1

# into C __del__
into C __init__
into C __del__

__str____repr__

__str__(self):

  • 当你打印一个对象的时候,触发__str__
  • 当你使用%s格式化的时候,触发__str__
  • str强转数据类型的时候,触发__str__

__repr__(self):

  • reprstr的备胎
  • __str__的时候执行__str__,没有实现__str__的时候,执行__repr__
  • repr(obj)内置函数对应的结果是__repr__的返回值
  • 当你使用%r格式化的时候 触发__repr__

【例子】

1
2
3
4
5
6
7
8
9
10
11
12
13
14
15
16
17
18
19
20
21
22
23
24
25
26
27
28
29
30
31
32
33
class Cat:
"""定义一个猫类"""

def __init__(self, new_name, new_age):
"""在创建完对象之后 会自动调用, 它完成对象的初始化的功能"""
self.name = new_name
self.age = new_age

def __str__(self):
"""返回一个对象的描述信息"""
return "名字是:%s , 年龄是:%d" % (self.name, self.age)

def __repr__(self):
"""返回一个对象的描述信息"""
return "Cat:(%s,%d)" % (self.name, self.age)

def eat(self):
print("%s在吃鱼...." % self.name)

def drink(self):
print("%s在喝可乐..." % self.name)

def introduce(self):
print("名字是:%s, 年龄是:%d" % (self.name, self.age))


# 创建了一个对象
tom = Cat("汤姆", 30)
print(tom) # 名字是:汤姆 , 年龄是:30
print(str(tom)) # 名字是:汤姆 , 年龄是:30
print(repr(tom)) # Cat:(汤姆,30)
tom.eat() # 汤姆在吃鱼....
tom.introduce() # 名字是:汤姆, 年龄是:30
名字是:汤姆 , 年龄是:30
名字是:汤姆 , 年龄是:30
Cat:(汤姆,30)
汤姆在吃鱼....
名字是:汤姆, 年龄是:30

__str__(self) 的返回结果可读性强。也就是说,__str__ 的意义是得到便于人们阅读的信息,就像下面的 ‘2019-10-11’ 一样。

__repr__(self) 的返回结果应更准确。怎么说,__repr__ 存在的目的在于调试,便于开发者使用。

【例子】

1
2
3
4
5
6
7
import datetime

today = datetime.date.today()
print(str(today)) # 2019-10-11
print(repr(today)) # datetime.date(2019, 10, 11)
print('%s' %today) # 2019-10-11
print('%r' %today) # datetime.date(2019, 10, 11)
2020-08-04
datetime.date(2020, 8, 4)
2020-08-04
datetime.date(2020, 8, 4)

2. 算术运算符

类型工厂函数,指的是不通过类而是通过函数来创建对象

【例子】

1
2
3
4
5
6
7
8
9
10
11
12
13
14
class C:
pass


print(type(len)) # <class 'builtin_function_or_method'>
print(type(dir)) # <class 'builtin_function_or_method'>
print(type(int)) # <class 'type'>
print(type(list)) # <class 'type'>
print(type(tuple)) # <class 'type'>
print(type(C)) # <class 'type'>
print(int('123')) # 123

# 这个例子中list工厂函数把一个元祖对象加工成了一个列表对象。
print(list((1, 2, 3))) # [1, 2, 3]
<class 'builtin_function_or_method'>
<class 'type'>
<class 'type'>
<class 'type'>
<class 'type'>
123
[1, 2, 3]
  • __add__(self, other)定义加法的行为:+
  • __sub__(self, other)定义减法的行为:-
1
2
3
4
5
6
7
8
9
10
11
12
13
14
15
16
17
18
19
20
21
22
23
24
25
26
27
28
29
30
31
32
33
34
35
36
37
38
39
40
class MyClass:

def __init__(self, height, weight):
self.height = height
self.weight = weight

# 两个对象的长相加,宽不变.返回一个新的类
def __add__(self, others):
return MyClass(self.height + others.height, self.weight + others.weight)

# 两个对象的宽相减,长不变.返回一个新的类
def __sub__(self, others):
return MyClass(self.height - others.height, self.weight - others.weight)

# 说一下自己的参数
def intro(self):
print("高为", self.height, " 重为", self.weight)


def main():
a = MyClass(height=10, weight=5)
a.intro()

b = MyClass(height=20, weight=10)
b.intro()

c = b - a
c.intro()

d = a + b
d.intro()


if __name__ == '__main__':
main()

# 高为 10 重为 5
# 高为 20 重为 10
# 高为 10 重为 5
# 高为 30 重为 15
高为 10  重为 5
高为 20  重为 10
高为 10  重为 5
高为 30  重为 15
  • __mul__(self, other)定义乘法的行为:*
  • __truediv__(self, other)定义真除法的行为:/
  • __floordiv__(self, other)定义整数除法的行为://
  • __mod__(self, other) 定义取模算法的行为:%
  • __divmod__(self, other)定义当被 divmod() 调用时的行为
  • divmod(a, b)把除数和余数运算结果结合起来,返回一个包含商和余数的元组(a // b, a % b)

【例子】

1
2
print(divmod(7, 2))  # (3, 1)
print(divmod(8, 2)) # (4, 0)
(3, 1)
(4, 0)
  • __pow__(self, other[, module])定义当被 power() 调用或 ** 运算时的行为
  • __lshift__(self, other)定义按位左移位的行为:<<
  • __rshift__(self, other)定义按位右移位的行为:>>
  • __and__(self, other)定义按位与操作的行为:&
  • __xor__(self, other)定义按位异或操作的行为:^
  • __or__(self, other)定义按位或操作的行为:|

3. 反算术运算符

反运算魔方方法,与算术运算符保持一一对应,不同之处就是反运算的魔法方法多了一个“r”。当文件左操作不支持相应的操作时被调用。

  • __radd__(self, other)定义加法的行为:+
  • __rsub__(self, other)定义减法的行为:-
  • __rmul__(self, other)定义乘法的行为:*
  • __rtruediv__(self, other)定义真除法的行为:/
  • __rfloordiv__(self, other)定义整数除法的行为://
  • __rmod__(self, other) 定义取模算法的行为:%
  • __rdivmod__(self, other)定义当被 divmod() 调用时的行为
  • __rpow__(self, other[, module])定义当被 power() 调用或 ** 运算时的行为
  • __rlshift__(self, other)定义按位左移位的行为:<<
  • __rrshift__(self, other)定义按位右移位的行为:>>
  • __rand__(self, other)定义按位与操作的行为:&
  • __rxor__(self, other)定义按位异或操作的行为:^
  • __ror__(self, other)定义按位或操作的行为:|

a + b

这里加数是a,被加数是b,因此是a主动,反运算就是如果a对象的__add__()方法没有实现或者不支持相应的操作,那么 Python 就会调用b__radd__()方法。

【例子】

1
2
3
4
5
6
7
8
9
class Nint(int):
def __radd__(self, other):
return int.__sub__(other, self) # 注意 self 在后面


a = Nint(5)
b = Nint(3)
print(a + b) # 8
print(1 + b) # -2
8
-2

4. 增量赋值运算符

  • __iadd__(self, other)定义赋值加法的行为:+=
  • __isub__(self, other)定义赋值减法的行为:-=
  • __imul__(self, other)定义赋值乘法的行为:*=
  • __itruediv__(self, other)定义赋值真除法的行为:/=
  • __ifloordiv__(self, other)定义赋值整数除法的行为://=
  • __imod__(self, other)定义赋值取模算法的行为:%=
  • __ipow__(self, other[, modulo])定义赋值幂运算的行为:**=
  • __ilshift__(self, other)定义赋值按位左移位的行为:<<=
  • __irshift__(self, other)定义赋值按位右移位的行为:>>=
  • __iand__(self, other)定义赋值按位与操作的行为:&=
  • __ixor__(self, other)定义赋值按位异或操作的行为:^=
  • __ior__(self, other)定义赋值按位或操作的行为:|=

5. 一元运算符

  • __neg__(self)定义正号的行为:+x
  • __pos__(self)定义负号的行为:-x
  • __abs__(self)定义当被abs()调用时的行为
  • __invert__(self)定义按位求反的行为:~x

6. 属性访问

__getattr____getattribute____setattr____delattr__

__getattr__(self, name): 定义当用户试图获取一个不存在的属性时的行为。

__getattribute__(self, name):定义当该类的属性被访问时的行为(先调用该方法,查看是否存在该属性,若不存在,接着去调用__getattr__)。

__setattr__(self, name, value):定义当一个属性被设置时的行为。

__delattr__(self, name):定义当一个属性被删除时的行为。

【例子】

1
2
3
4
5
6
7
8
9
10
11
12
13
14
15
16
17
18
19
20
21
22
23
24
25
26
27
class C:
def __getattribute__(self, item):
print('__getattribute__')
return super().__getattribute__(item)

def __getattr__(self, item):
print('__getattr__')

def __setattr__(self, key, value):
print('__setattr__')
super().__setattr__(key, value)

def __delattr__(self, item):
print('__delattr__')
super().__delattr__(item)


c = C()
c.x
# __getattribute__
# __getattr__

c.x = 1
# __setattr__

del c.x
# __delattr__
__getattribute__
__getattr__
__setattr__
__delattr__

扩展参考:

7. 描述符

描述符就是将某种特殊类型的类的实例指派给另一个类的属性。

  • __get__(self, instance, owner)用于访问属性,它返回属性的值。
  • __set__(self, instance, value)将在属性分配操作中调用,不返回任何内容。
  • __del__(self, instance)控制删除操作,不返回任何内容。

【例子】

1
2
3
4
5
6
7
8
9
10
11
12
13
14
15
16
17
18
19
20
21
22
23
24
class MyDecriptor:
def __get__(self, instance, owner):
print('__get__', self, instance, owner)

def __set__(self, instance, value):
print('__set__', self, instance, value)

def __delete__(self, instance):
print('__delete__', self, instance)


class Test:
x = MyDecriptor()


t = Test()
t.x
# __get__ <__main__.MyDecriptor object at 0x000000CEAAEB6B00> <__main__.Test object at 0x000000CEABDC0898> <class '__main__.Test'>

t.x = 'x-man'
# __set__ <__main__.MyDecriptor object at 0x00000023687C6B00> <__main__.Test object at 0x00000023696B0940> x-man

del t.x
# __delete__ <__main__.MyDecriptor object at 0x000000EC9B160A90> <__main__.Test object at 0x000000EC9B160B38>
__get__ <__main__.MyDecriptor object at 0x0000023DF0C7A4C8> <__main__.Test object at 0x0000023DF0C7A508> <class '__main__.Test'>
__set__ <__main__.MyDecriptor object at 0x0000023DF0C7A4C8> <__main__.Test object at 0x0000023DF0C7A508> x-man
__delete__ <__main__.MyDecriptor object at 0x0000023DF0C7A4C8> <__main__.Test object at 0x0000023DF0C7A508>

扩展参考:

  • [技术图文:什么是Python的描述符?](

8. 定制序列

协议(Protocols)与其它编程语言中的接口很相似,它规定你哪些方法必须要定义。然而,在 Python 中的协议就显得不那么正式。事实上,在 Python 中,协议更像是一种指南。

容器类型的协议

  • 如果说你希望定制的容器是不可变的话,你只需要定义__len__()__getitem__()方法。
  • 如果你希望定制的容器是可变的话,除了__len__()__getitem__()方法,你还需要定义__setitem__()__delitem__()两个方法。

【例子】编写一个不可改变的自定义列表,要求记录列表中每个元素被访问的次数。

1
2
3
4
5
6
7
8
9
10
11
12
13
14
15
16
17
18
19
20
21
22
23
24
class CountList:
def __init__(self, *args):
self.values = [x for x in args]
self.count = {}.fromkeys(range(len(self.values)), 0)

def __len__(self):
return len(self.values)

def __getitem__(self, item):
self.count[item] += 1
return self.values[item]


c1 = CountList(1, 3, 5, 7, 9)
c2 = CountList(2, 4, 6, 8, 10)
print(c1[1]) # 3
print(c2[2]) # 6
print(c1[1] + c2[1]) # 7

print(c1.count)
# {0: 0, 1: 2, 2: 0, 3: 0, 4: 0}

print(c2.count)
# {0: 0, 1: 1, 2: 1, 3: 0, 4: 0}
3
6
7
{0: 0, 1: 2, 2: 0, 3: 0, 4: 0}
{0: 0, 1: 1, 2: 1, 3: 0, 4: 0}
  • __len__(self)定义当被len()调用时的行为(返回容器中元素的个数)。
  • __getitem__(self, key)定义获取容器中元素的行为,相当于self[key]
  • __setitem__(self, key, value)定义设置容器中指定元素的行为,相当于self[key] = value
  • __delitem__(self, key)定义删除容器中指定元素的行为,相当于del self[key]

【例子】编写一个可改变的自定义列表,要求记录列表中每个元素被访问的次数。

【例子】编写一个可改变的自定义列表,要求记录列表中每个元素被访问的次数。

1
2
3
4
5
6
7
8
9
10
11
12
13
14
15
16
17
18
19
20
21
22
23
24
25
26
27
28
29
30
31
32
33
34
35
36
class CountList:
def __init__(self, *args):
self.values = [x for x in args]
self.count = {}.fromkeys(range(len(self.values)), 0)

def __len__(self):
return len(self.values)

def __getitem__(self, item):
self.count[item] += 1
return self.values[item]

def __setitem__(self, key, value):
self.values[key] = value

def __delitem__(self, key):
del self.values[key]
for i in range(0, len(self.values)):
if i >= key:
self.count[i] = self.count[i + 1]
self.count.pop(len(self.values))


c1 = CountList(1, 3, 5, 7, 9)
c2 = CountList(2, 4, 6, 8, 10)
print(c1[1]) # 3
print(c2[2]) # 6
c2[2] = 12
print(c1[1] + c2[2]) # 15
print(c1.count)
# {0: 0, 1: 2, 2: 0, 3: 0, 4: 0}
print(c2.count)
# {0: 0, 1: 0, 2: 2, 3: 0, 4: 0}
del c1[1]
print(c1.count)
# {0: 0, 1: 0, 2: 0, 3: 0}
3
6
15
{0: 0, 1: 2, 2: 0, 3: 0, 4: 0}
{0: 0, 1: 0, 2: 2, 3: 0, 4: 0}
{0: 0, 1: 0, 2: 0, 3: 0}

9. 迭代器

  • 迭代是 Python 最强大的功能之一,是访问集合元素的一种方式。
  • 迭代器是一个可以记住遍历的位置的对象。
  • 迭代器对象从集合的第一个元素开始访问,直到所有的元素被访问完结束。
  • 迭代器只能往前不会后退。
  • 字符串,列表或元组对象都可用于创建迭代器:

【例子】

1
2
3
4
5
6
7
8
9
10
11
12
13
14
15
16
17
18
string = 'lsgogroup'
for c in string:
print(c)

'''
l
s
g
o
g
r
o
u
p
'''

for c in iter(string):
print(c)
l
s
g
o
g
r
o
u
p
l
s
g
o
g
r
o
u
p

【例子】

1
2
3
4
5
6
7
8
9
10
11
12
links = {'B': '百度', 'A': '阿里', 'T': '腾讯'}
for each in links:
print('%s -> %s' % (each, links[each]))

'''
B -> 百度
A -> 阿里
T -> 腾讯
'''

for each in iter(links):
print('%s -> %s' % (each, links[each]))
B -> 百度
A -> 阿里
T -> 腾讯
B -> 百度
A -> 阿里
T -> 腾讯
  • 迭代器有两个基本的方法:iter()next()
  • iter(object) 函数用来生成迭代器。
  • next(iterator[, default]) 返回迭代器的下一个项目。
  • iterator — 可迭代对象
  • default — 可选,用于设置在没有下一个元素时返回该默认值,如果不设置,又没有下一个元素则会触发 StopIteration 异常。

【例子】

1
2
3
4
5
6
7
8
9
10
11
12
13
14
15
16
17
18
19
links = {'B': '百度', 'A': '阿里', 'T': '腾讯'}
it = iter(links)
print(next(it)) # B
print(next(it)) # A
print(next(it)) # T
print(next(it)) # StopIteration


it = iter(links)
while True:
try:
each = next(it)
except StopIteration:
break
print(each)

# B
# A
# T
B
A
T


---------------------------------------------------------------------------

StopIteration                             Traceback (most recent call last)

<ipython-input-14-8b6f10d85547> in <module>
      4 print(next(it))  # A
      5 print(next(it))  # T
----> 6 print(next(it))  # StopIteration
      7 
      8 


StopIteration: 

把一个类作为一个迭代器使用需要在类中实现两个魔法方法 __iter__()__next__()

  • __iter__(self)定义当迭代容器中的元素的行为,返回一个特殊的迭代器对象, 这个迭代器对象实现了 __next__() 方法并通过 StopIteration 异常标识迭代的完成。
  • __next__() 返回下一个迭代器对象。
  • StopIteration 异常用于标识迭代的完成,防止出现无限循环的情况,在 __next__() 方法中我们可以设置在完成指定循环次数后触发 StopIteration 异常来结束迭代。

【例子】

1
2
3
4
5
6
7
8
9
10
11
12
13
14
15
16
17
18
19
20
21
class Fibs:
def __init__(self, n=10):
self.a = 0
self.b = 1
self.n = n

def __iter__(self):
return self

def __next__(self):
self.a, self.b = self.b, self.a + self.b
if self.a > self.n:
raise StopIteration
return self.a


fibs = Fibs(100)
for each in fibs:
print(each, end=' ')

# 1 1 2 3 5 8 13 21 34 55 89
1 1 2 3 5 8 13 21 34 55 89 

10. 生成器

  • 在 Python 中,使用了 yield 的函数被称为生成器(generator)。
  • 跟普通函数不同的是,生成器是一个返回迭代器的函数,只能用于迭代操作,更简单点理解生成器就是一个迭代器。
  • 在调用生成器运行的过程中,每次遇到 yield 时函数会暂停并保存当前所有的运行信息,返回 yield 的值, 并在下一次执行 next() 方法时从当前位置继续运行。
  • 调用一个生成器函数,返回的是一个迭代器对象。

【例子】

1
2
3
4
5
6
7
8
9
10
11
12
13
14
15
16
17
18
19
20
21
22
23
def myGen():
print('生成器执行!')
yield 1
yield 2


myG = myGen()
print(next(myG))
# 生成器执行!
# 1

print(next(myG)) # 2
# print(next(myG)) # StopIteration

myG = myGen()
for each in myG:
print(each)

'''
生成器执行!
1
2
'''
生成器执行!
1
2
生成器执行!
1
2


'\n生成器执行!\n1\n2\n'

【例子】用生成器实现斐波那契数列。

1
2
3
4
5
6
7
8
9
10
11
12
13
14
def libs(n):
a = 0
b = 1
while True:
a, b = b, a + b
if a > n:
return
yield a


for each in libs(100):
print(each, end=' ')

# 1 1 2 3 5 8 13 21 34 55 89
1 1 2 3 5 8 13 21 34 55 89 

参考文献